Appearance and design
There are a number of options available in terms of the appearance and design of your Online Booking. You can, for example, add a logo to your Online Booking, choose the order of the booking process, and add a map showing where you are located. Most of these settings can be found under ‘Settings’ –> ‘Online Booking’ –> Appearance.
Information
In the Appearance menu, you will be able to edit the information visible in your Online Booking. Choose a header, edit the URL link that will represent your business, and add a description about your business or booking process:

You can also add an image or logo to your Online Booking. To attach a map showing exactly your location, activate the Address function here as well:

Note: To edit your address, phone number, email, or the name of your clinic, you need to change the settings in your main Profile. The Profile settings can be found under ‘Settings’ –>’Your Profile’.
Finally, click on Save Settings at the top of the page to save your information.
Booking Flow
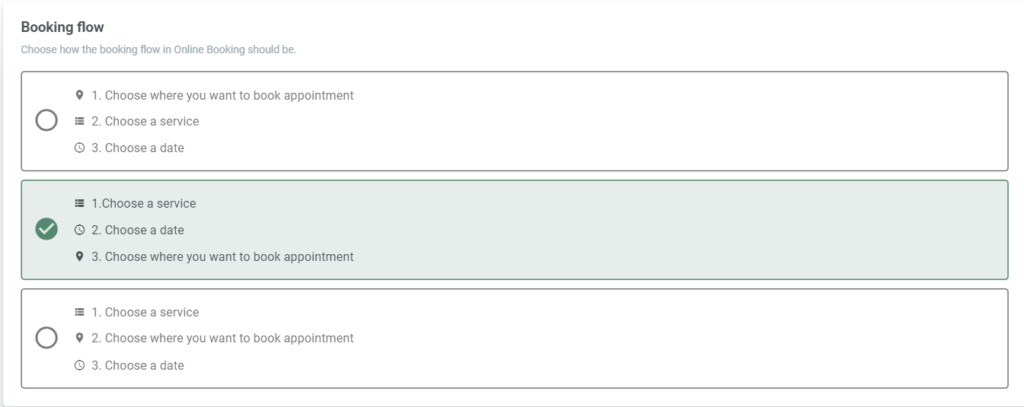
The ‘Booking flow’ determines the order of your booking process. Which booking flow you prefer depends solely on your organization, but we will shortly guide you through the options:

- Alternative 1: Calendar, service, date. This alternative is suitable for businesses that, for example, provide services in several different locations. They can also offer specialized treatments with different employees. Clients will then be offered to first choose which calendar (i.e. location or employee) they would like to book an appointment in. Secondly, they can choose the particular service and date.
- Alternative 2: Service, date, calendar. This alternative works well for businesses working with only one calendar. It is also recommended for businesses where the location or employee are unimportant. The service and date will then determine which calendar the client will book an appointment in.
- Alternative 3. Service, calendar, date. This alternative serves as a middle way. If several calendars are available, they can be chosen by your clients. They will, however, be of secondary importance to the available services.
Fields
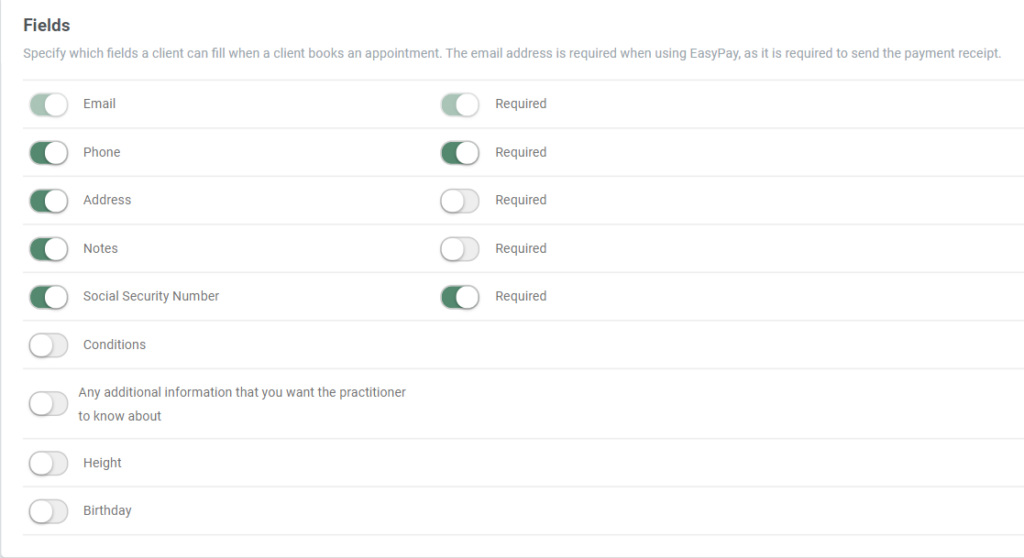
Under ‘Fields’, you will be able to choose which fields your clients should fill in when they book an appointment. You can also choose whether or not the fields should be mandatory to fill in.

An email address is always required if you have activated EasyPay, as receipts are sent out by email.
Note: If you are using the app ‘Custom fields’, your tailor-made fields will be visible here. Read more about the app Custom Fields here.