
You can take a look at this guide to getting started with your online booking system, EasyPractice, in your own time and refer back to it at any point to have a demonstration of EasyPractice! The webinar here shows how you can use your account and the best ways to get started. This way you can be confident you are making the most out of your EasyPractice account.
The aim of this webinar is to provide you with the best footing for using EasyPractice. It is an intuitive and easy to use system but there is no harm in giving you step-by-step guidance when you are new to EasyPractice or you just fancy some extra help!
Here you will find the video and below, a transcript of everything included in the guide. You can follow along in your own account, skim the text or watch the video at your own pace. We hope that you will find a way that works for you!
Video Contents:
| 00:00 | Welcome | |||
| 00:17 | Calendar | |||
| 01:29 | Apps | |||
| 04:11 | Settings | |||
| 05:53 | Clients | |||
| 08:08 | Services | |||
| 09:22 | Invoices | |||
| 11:40 | Statistics | |||
| 12:41 | Multiple Calendars |
The Webinar:
Transcript:
Welcome
Welcome to this webinar on demand where I will show you EasyPractice. This video is intended for you.
If you’d like an overview of what easy practice can offer. And if you’re just getting started with your account, I’ll show you the best ways to get set up.
To create an account, you can sign up with your email address and be ready to start right away!
Calendar
When you first log in, you will see the calendar page. You can easily change between the tabs along the top of the screen to access different parts of EasyPractice such as Clients, Invoices and your Settings. This is indicated in the screenshot below.
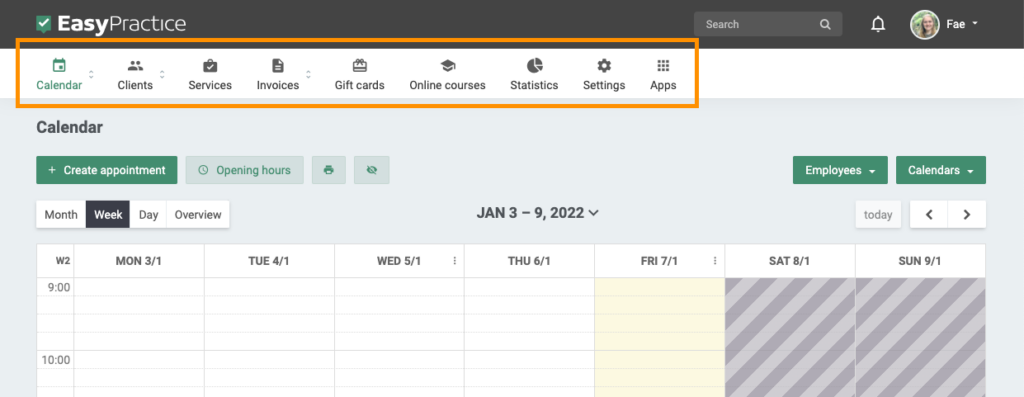
To create an appointment, click on the button “Create appointment”. Then choose if you want to create a client appointment, other appointment or an event, or if you want to turn off your online booking for a period. Also, you can click anywhere on the calendar to do the same.
Once you’ve selected to create a client appointment, you can choose the start time and end time and select your client if you already have them in the system. You can choose the correct calendar and if there is a particular employee that’s taking this appointment. Also choose the service and then set up your appointment reminder and confirmation messages.
Appointment reminder and confirmation messages can be edited in Settings -> Email and SMS.
Click “Add” and the appointment will be added to your calendar already. If you then click on the appointment, you can edit, view the journal for the client, create a next appointment and do many other actions depending on what you’ve activated in your account.
Apps
The “Apps” tab is a good place to get started from here. If you scroll down, you can see all of the apps that we have on offer and activate the ones which you think will be relevant for you. Of course, you can always come back to the apps tab and activate or deactivate apps if you change your mind.
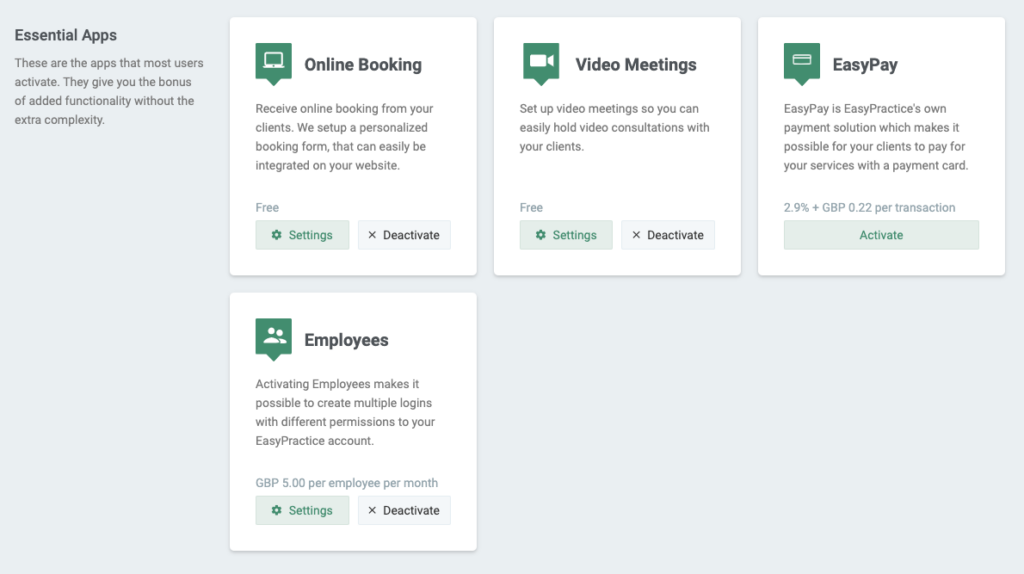
At the top of the screen, you will see the newest apps and then the essential apps that I’d recommend. You can see these in the image below. If you activate online booking here, then your clients will be able to book appointments online through your online booking form, and you’ll see them as notifications and in your calendar.
Other useful apps
The Video Meetings app is useful if you want to have consultations online with your clients and you can easily send invitations to clients when you’ve activated this app.
EasyPay should be activated if you want to take payments online while your client is booking, and then you can choose whether your client’s cards should be charged at the time of booking, or if the payment should be reserved until the time of the appointment. It’s easy this way to combine your booking and payment system!
The Employees app is helpful if you have multiple people working at the practice because you can create multiple logins with different permissions to your EasyPractice account.
There are many other apps such as Events and Google Calendar which allows you to sync with your calendar in EasyPractice. You can also activate the Journals app where you can create journals for your clients, keep notes on appointments and add text, photos and other files.
Further down, you will see the security section where you can activate the Secure Messages app if you want to send encrypted messages to your clients.
Then you will see the apps related to your services. For example, Vouchers and Gift Cards or Discount Codes.
If you activate Online Booking, you can also activate the Facebook login integration for your clients so that they can log in using their Facebook login.
In the accounting section, we have the Reports app where you can get a summary of the figures in your account.
There are also more payment apps and at the bottom of the page you will find the advanced apps. Here, you can activate Google Analytics or our API, for example.
Settings
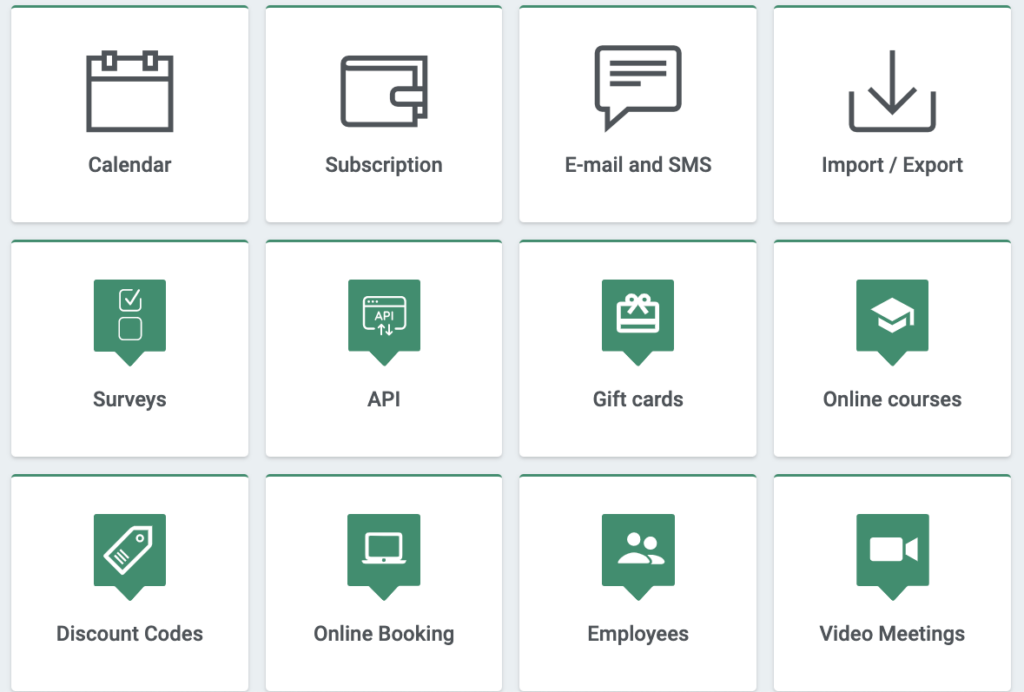
Once you’ve activated the apps that you want, you can go to the Settings tab in the top toolbar. This is where you can change the settings for all different parts of the system. Click on the relevant settings from the options seen below and you can change your preferences. Your profile is where you can change your password, for example.
If you go to the Import/Export setting, you can import clients if you have them in another system. Click “Import clients” and then upload a CSV file. Your clients will be imported to your account.
From the Settings page, if you click on online booking (if you’ve activated this app) this is where you can change the settings for your online booking form. Of course, there’s a header and a URL and you can add a description and an image. You can also change the language, choose which fields are visible and change the booking flow. There are 3 options for the booking flow which you can choose from.
On this page, you can change the available times, client login settings, and other settings as well. Also, if you want to view your online booking so that you can see it as your clients will see it, you can click on the button “Click here to view your online booking” and you’ll see that in a new tab.
If you want to put your online booking form on your website, you can click this option too and you’ll be presented with some videos to show you how to get it on your website as a popup or embedded, or as a link straight to the URL, which is the one you view on the settings page.
Clients
The Clients tab is where you can gain an overview of all clients and also add new client profiles. To do this click “Add client.” Once you click here, you can put in the client’s information, then click “add” at the bottom. Then, you will be able to see the client’s profile.
The image below is an example of a client. You can see their contact information down the left and then across the top of the page, you can see the tabs for different parts of the profile.

The journal is the place to keep notes and when you click “create new journal entry,” you can enter your text. You can also add templates, which is something you can do in your settings. Using the icon with a file and a plus, you can add images and files and they’ll show down the right hand side.
If you’ve activated Secure Messages, you can type messages under the “Messages” tab and your clients can also reply to you when they log in.
Under “Notifications”, you’ll see if you’ve sent messages to your client and if they’ve booked appointments. Scroll down to see the history of notifications and under “Appointments”, you will also see the history of their appointments.
Next is “Invoices” and whether or not they’ve been paid is indicated by the colour next to the invoice. Of course, you can click on an individual invoice if you want to go straight to the invoice. Other tabs you will see in the video will show up if you have activated them in your account.
Selecting clients
Back on the main “Client” page, you can select groups of clients. If you wanted to select a few clients, use the “select clients” button and you will then see different actions you can do at the bottom of your screen. For example, you may delete them or send a group email or a survey.
You can also choose to sort clients alphabetically or in a different way and you can choose to show all clients or different groups of them. This is indicated in the video.
Services
The “Services” tab is where you can set up services that your clients can book with you or you can set up appointments for through the calendar yourself.
If you click “create new,” you can choose to create a service, additional service, service group or voucher. When you click “Create new”, you will see the box as in the image here.

Enter the information for the service you are creating such as the name, a description, the duration, whether there’s a break after the service, the price and which calendars the service belongs to.
If you have different employees, you can choose if the service is available from all of them or available in different rooms and locations indicated by different calendars. When you click “next,” you can choose if it’s available through your booking.
If you make a service available through your online booking, your clients can book an appointment for this service online when they use your online booking form.
Invoices
To create an invoice, go to your calendar and then select an appointment that you have already created. If you click on this appointment, you will see a button that says “create new invoice”. If you click here, it’s a very easy way to create the invoice without having to enter anything manually. It shows the service that you’ve already selected when you or your client created the appointment.
Once you’ve created an invoice, you can approve it or create it as a draft to edit later.
On your overview of invoices, you’ll have a total turnover this year, this month and this week. You will also have an overview of all invoices you have created and you can tell from the colours on each invoice, whether they’re drafts, due or paid.
Sending invoices
Once you have created an invoice and it is approved, you can choose to send the invoice to your client by selecting the button “send invoice”. You choose whether there’s a link to the invoice, (which is a safer way to send it where they will need the link and a PIN to view it) or you can also attach it to the email.
When you use the link and PIN, there is an added layer of security so that nobody else can view the invoice with the link. You could also choose to send to Zettle if you’re using our integration with POS systems.
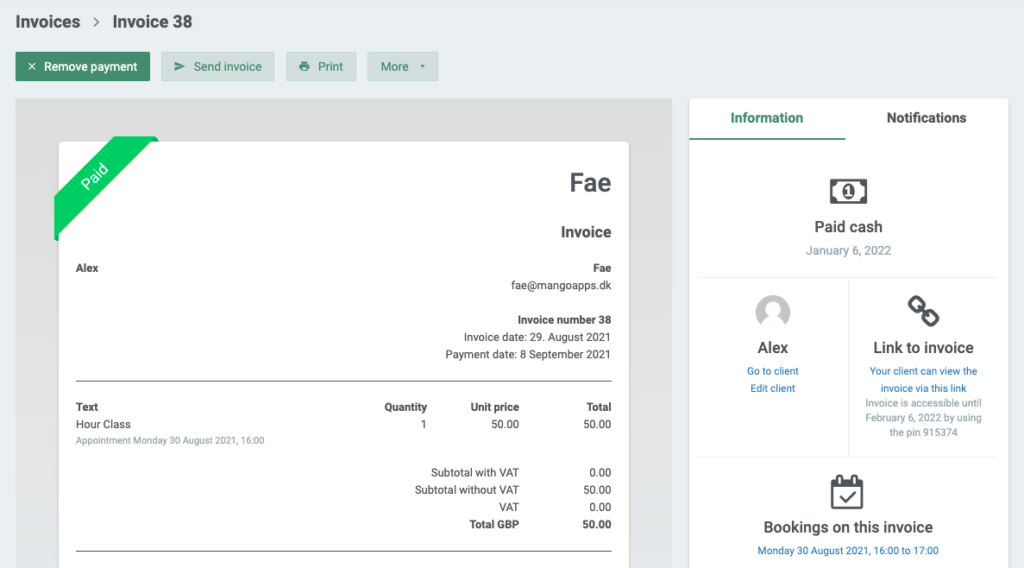
Once you mark an invoice as paid, you can select the payment method, payment date, and then the invoice will be marked as “paid”, as in the image below. This example also says “paid cash” and the date that it was paid. The “Notifications” tab on the far right will show you the history of the invoice such as when it was created and when it was paid.
Statistics
Next is the “Statistics” tab which shows an overview of all activity in your practice. The example in the image below shows all calendars and no particular employee, in the last 90 days.
This example shows the number of hours and appointments spent with clients, the distribution of appointments in the calendars, the distribution of services and appointments and the different types of services that have been booked.
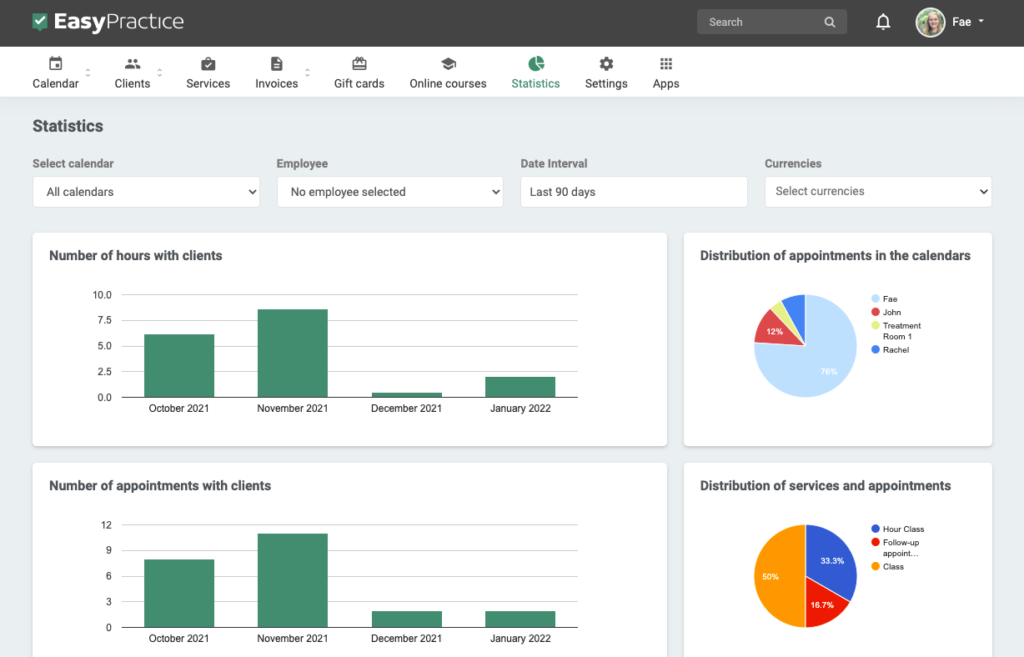
You can also choose just to view one calendar or one employee so that you can compare different parts of your practice and see which services are most popular. This could also be useful to see which times of year different services are booked.
Multiple Calendars
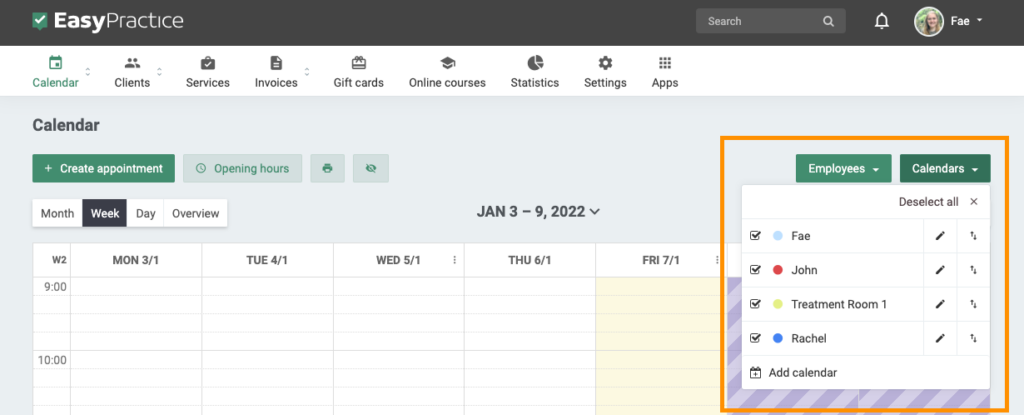
Finally, back on the “Calendars” page, it may be useful for you to see how to create different calendars. At the top right hand corner of your calendar you will see the buttons “Employees” and “Calendars”.
If you’ve set up different accounts for employees, you can click on the arrow and then choose whether you want to see all of them at once or just an overview of one employee.
If you click on “calendars”, you can see all the different ones that you have created. Click “Add calendar” to create a new one.
If you have different rooms or locations, you can create a standard calendar type so that you can keep track of what’s happening in that location. Alternatively, if the calendar is for an employee, you can create a new calendar for that employee specifically.
At the top left of the calendar, you have options to change the calendar view from week, day or month, or you can have a full overview of all of the different calendars that you have created.
So I hope you now have a good sense of how to get started from this guide. If you have any questions you can contact us directly.
We’ll look forward to hearing from you!
Anything else?
If there is something else you are looking for, we have a bunch of helpful advice and guides in our Help Pages and on our Getting Started Guide. Of course, if you’d like us to point something out to you or have further questions about anything at all, just get in touch at [email protected] and we’ll be happy to help at any time!
 alt tab and computer
  alt Online scheduling
  alt Create special Vouchers for your services