
We are very happy to present our new app to you! Online Courses is an app in which you can create content for your clients to go through online. They can purchase in different stages and you can add whatever content you see fit.
With a range of functionalities, you can create personal and professional courses that you offer your customers directly in our system. This includes the opportunity to:
- Combine informative texts with videos and pictures for a better course experience
- Upload files and link to external sites
- Let your customers sign up and pay for the course directly through your online booking
The following is a guide to the new app so that you can see how each function works. If you prefer to watch a video demo, you can watch one here:
Create a new online course: Categories and Pages
Click on “Create new online course” to begin making your first online course. Fill in the name of the course and then start with the course content. Here you can first choose between creating a “Category” or a “Page”. Several pages can be linked under the same category, which gives a better overview of the course parts. In the image example below, you can see a category (Meditation) with two associated pages.
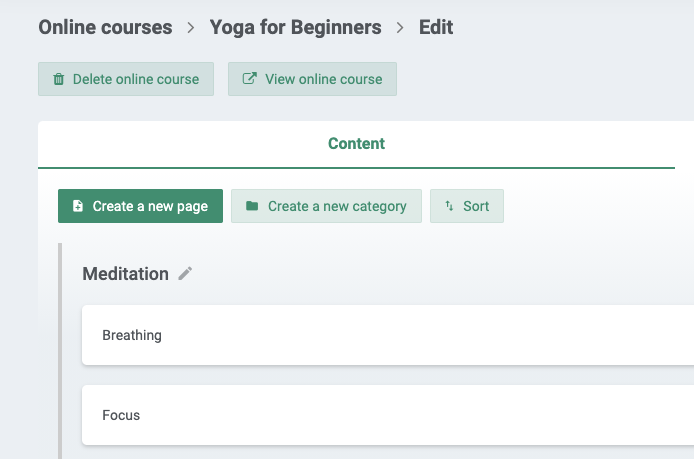
On the editing page for your specific course, you will be able to see all the categories and pages that you have created. You can re-sort all categories and pages can be easily if you want to change the layout afterwards. Then click on “Sort” and the different rows will be moveable using the arrows. If you select “Sort” again, the placements are saved.
If you want to see what it will all look like for your customers, click on “View online course” at the top of the overview page. You will see the page for the course as it will be seen by your customers.
Content for online courses
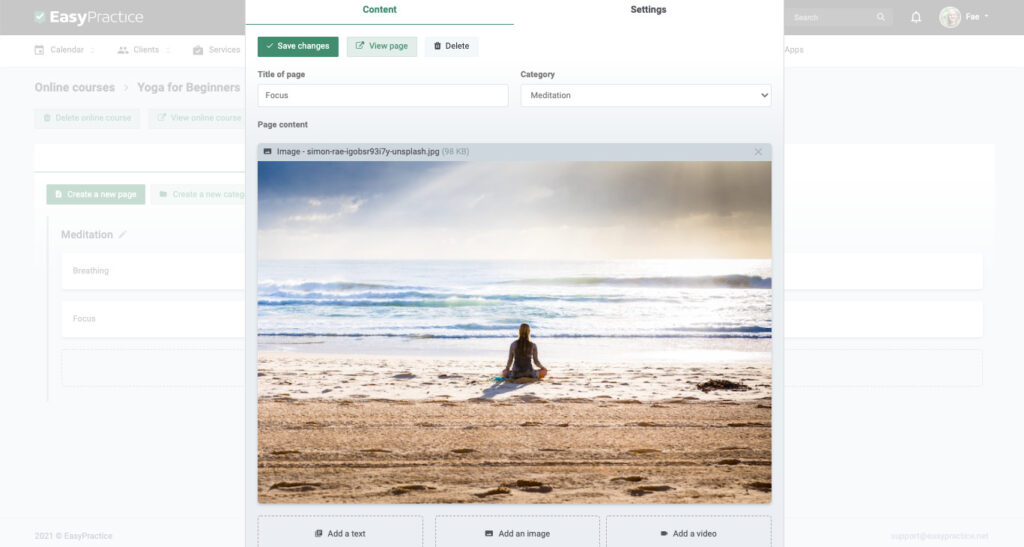
When it comes to the actual content on the pages, there are several different options. Here, you can add text, images, videos and files.
Text
First and foremost, it is important to fill in your text on the course page. The text box gives you several options for font, size and layout. Here you can also choose to insert an image directly into the text and link directly to an external media. The system is ready for around 2000 different services so when you copy a link from another website such as YouTube or Twitter, the embedded media will look good and it is automatically formatted to a nice image format. Finally, remember to save any changes to the text box.
Images and Video
You can also add an image or video before or after the text box. Click “Add Image” or “Add Video” and select a file from your device. Note that it can take up to 15 minutes for a high quality video to upload. You can always open another tab on your browser and have the video uploaded while doing something else.
Here, too, you can subsequently change the order for image / video and text. Then click on “Sort content”, so you can easily move the different lines.
Files
Finally, you can also add other files to the content. It can, for example, be an article or a PDF file that you would like to share with your course participants. The files will end up at the bottom of the page.
Introduction to the online course
In order for your customers to want to register for the course, they obviously need some advance information. Therefore, it is important that a clear and inviting introduction to the course is available to all interested parties – regardless of whether they choose to register for the course or not.
You change the introduction, or the description of the course, under “Settings”. Here you have the opportunity to fill in text and image in the same way as for the pages. The introduction will then be visible in your online booking when your customers click on the course.
Access to online course content
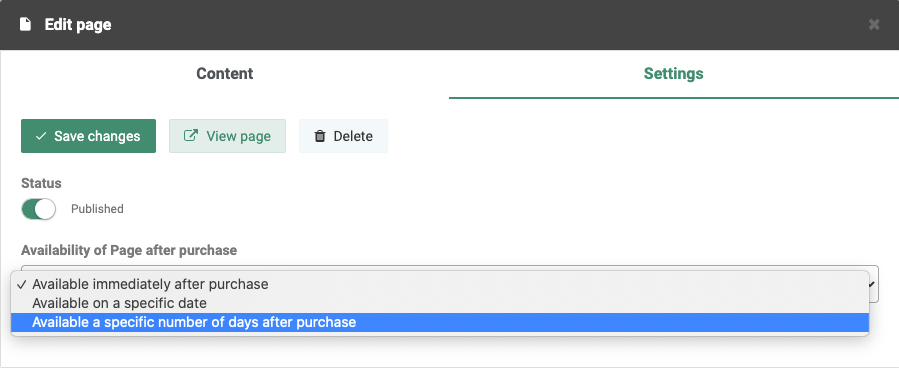
You choose when different course elements should be available to the course participants . Maybe you want to make a new course element available each week. Or do you want a specific course component to be available only one month after the course has started? Here you will find three options in the system:
- Make the entire course available immediately upon purchase.
- Choose to make parts of the course available on a specific date.
- Make parts of the course available a certain number of days after purchase.
You can set each category and page according to these options. To set the options, click on a category or page in the overview. Then click on “Settings” and select the option that best suits you.
In the overview, you will then be able to see exactly when each part is made available.
Editing and publishing
Of course, you want to be completely finished with the course content before it is all published on the website. To publish a course page (or an entire category), click on a specific page and then on “Settings”. Under “Status” you can then choose to publish the page. That way, you do not have to worry about publishing anything before you have actually finished the pages. In addition, you do not have to publish all pages at once. Instead, you can continue to edit course elements later on, without your course participants directly taking part in the content.
You can also save all unfinished pages as drafts by clicking on “Save changes”.
To finally publish your course (regardless of whether it applies to all course pages or only a few), go again to ‘Online courses’ in EasyPractice’s main menu and click on the course. Here you see the overall status of whether it is published or not. To publish the course, click on “Click here to publish the online course”.
Your participants will then be able to open the course and read the description and any content. In addition, they will be able to see what dates future course pages will be updated and made available.
Registration and payment for online courses
Just like in EasyPractice in general, you can choose between adding course participants manually to the system, or letting your clients register themselves through your online booking. Here are both options.
Pricing
To set the price that will apply to the course, go to the ‘Online courses’ tab and click on ‘Settings’. Here you can set which price applies. Leave the field blank if the course is free.
Add participants manually
To add participants manually, again go to ‘Online courses’ in the menu and click on the course as it applies. To be able to invite participants, you must first publish the course. When you have published your course, click on “Add purchase of online course”.
Here you can choose between adding both existing or new clients. You can also choose to create an invoice and attach it to the email sent to the client.
Finally click on “Add”. Then an invitation to the course is automatically sent directly to your client.
Registration via your online booking
Your clients can also register for the course directly via your online booking. Using the course booking app is the simplest way for your clients to register. If they register via the course booking app, you don’t have to do anything regarding their registration. Then the participants receive an invitation via email directly upon registration. In addition, both invoicing and payment can be handled completely automatically.
The online courses get their own tab in your online booking. When your clients click on the tab, all online courses and a short summary of the courses will be displayed on the home page. Then the clients can easily click on a specific course and see the full description.
At the bottom, they can choose to sign up for the course. Once the registration has been made, and the payment information has been filled in, they will receive an automatic email with an invitation to the course and a receipt for the purchase (if the course costs something). Quick, easy and simple!
Statistics and invoice information
Finally, the overview page for your online courses should also be mentioned. When you click on an online course, you will find information here about:
- The number of people who signed up for the course
- Total income for the course
- Course status (whether it is published or not)
- Information about participants and invoices. Click on a participant to see more information about the payment.
We hope this guide could give you a kick-start to our new app ‘Online Courses’. The app is simple and intuitive to use, but still contains a number of functions that can be good to keep track of.
In our Help Centre we have a whole section dealing with our Online Course Function.
If you have any questions or comments, please get in touch at [email protected] and we’ll get right back to you! ? If you wish to try out our booking system free of charge to see if it works for you!
 alt tab and computer
  alt Online scheduling
  alt Create special Vouchers for your services