We place a huge emphasis on your calendar! Since EasyPractice was founded in 2012, we have constantly focused on developing new functions and updates to the system that make it easier for our users. We want to develop a system that makes it easy but also fun to handle administrative tasks, with constant updates based on feedback from our customers. One of the most requested updates has been to be able to create more calendars.
The calendar is probably the function that many of our customers use the most. For the most part, the calendar is important precisely because it provides a good overview of bookings and agreements. For those who use Online booking and who have automated their booking flow, the calendar function is probably a little extra appreciated. As it is one of our core functions, we have made sure that the calendar is intuitive and offers several smart ways to make your everyday life a little easier. In this post, we go through how and why to create more calendars. We also give tips on what you can do to get the most out of your calendar.
Multiple calendars
There can be several reasons why you need more than just one calendar. Maybe you have several employees who all need a separate calendar or maybe your services are offered in several different places. With EasyPractice, it is possible to create several calendars, as needed!
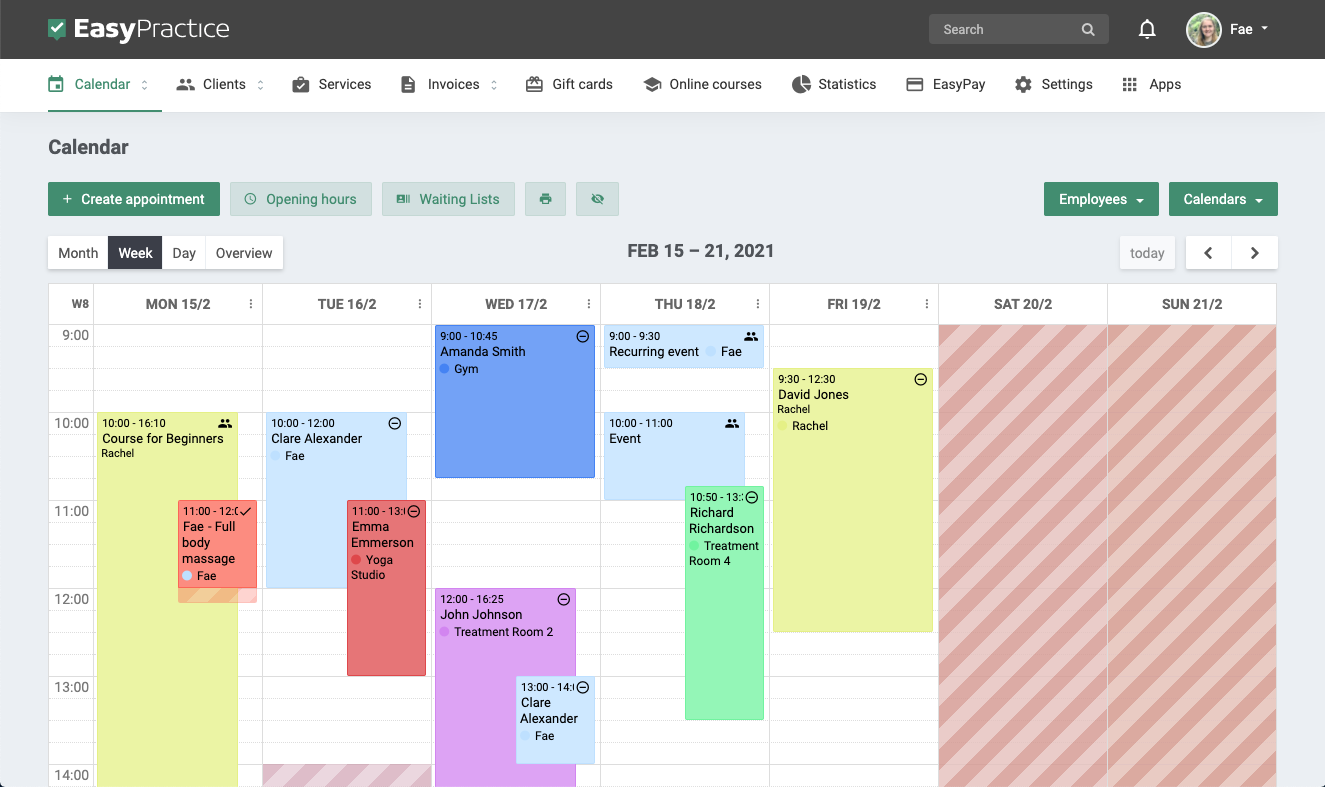
The calendar is the first thing you see when you log in to your EasyPractice account. You decide if you want the calendar to be displayed in full month, week or day. If you have created more calendars, you also decide which calendar (s) to display when you log in to your account. Do you only want to see your own calendar when you log in? Or do you want to see all calendars at once? You can choose which calendar you want to see by clicking on “Calendar”.

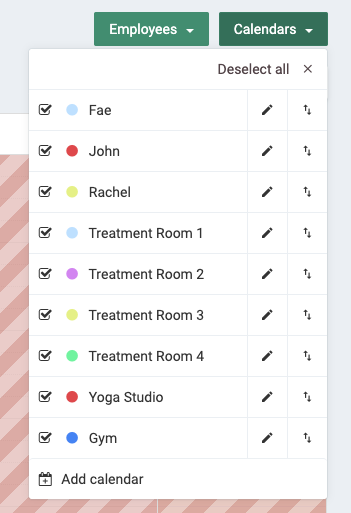
By creating several calendars, more employees can manage each calendar without the bookings being mixed up. Through colour coding , it is easy to distinguish between which employee has which booking in the main calendar. You add new calendars by clicking “Add calendar”. Then you get two choices: create a calendar for an employee or create a default calendar. Creating several standard calendars can be useful if, for example, you offer your services in several places. Then you can have separate opening hours for different premises, and make it clearer for your customers at which place they book an appointment.
If you work alone and in one place, we recommend using only one calendar. Otherwise you risk getting double bookings. If you would like to sort your services into different categories, for a nicer and clearer online booking, we recommend instead creating so-called “Service Groups”. Go to Services in the top toolbar and click to create a new service group.
Activate “Online Booking”
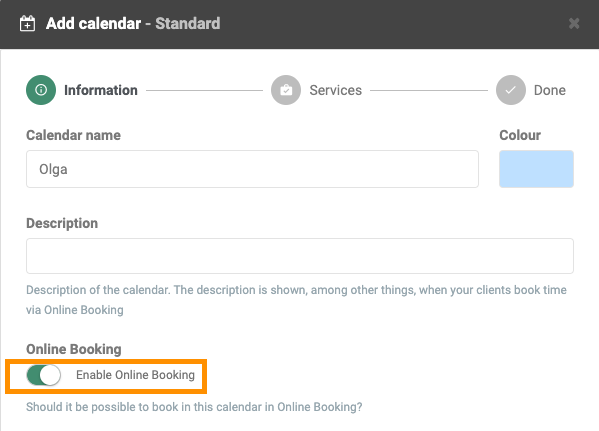
When you add a calendar, you decide the name and colour of the calendar. This can always be changed. Remember to activate the calendar for online bookings if you want your customers to be able to book an appointment in the new calendar via your online booking. If you wish to do this later, it is always possible to change under “Settings” -> “Online Booking”.
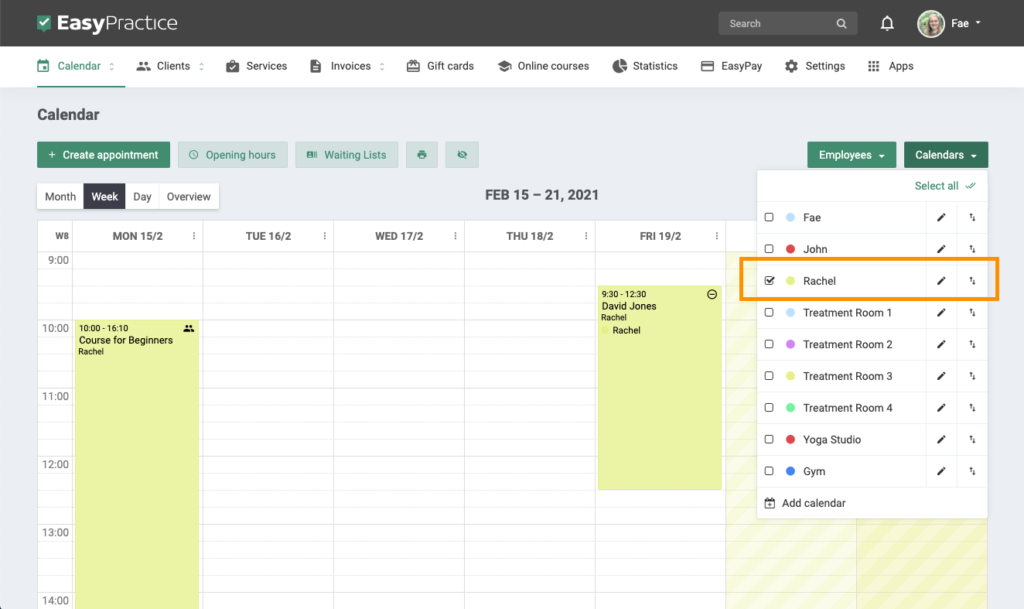
It is easy to navigate between the different calendars. By, for example, selecting an employee’s calendar, only bookings that this employee has in their calendar are displayed.
More employees
To be able to add a calendar for each employee, you must first activate the “Employees” app. You can find the app under “Apps” in the main menu. Then you create a profile for the employee and fill in the information that you think is important. Here you can fill in names, add an image and determine custom permissions for different functions. The employee will also have their own login to the EasyPractice account. When you choose to add a new calendar for an employee, it will be possible to create a calendar directly linked to the employee.
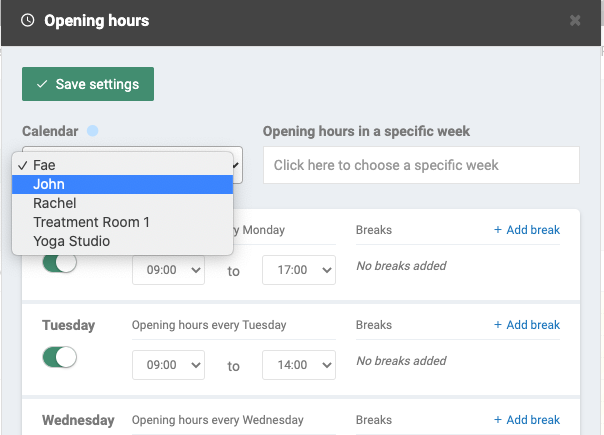
Different opening hours
As you may have different opening hours depending on who provides the treatments, we have made it possible to add specific opening hours for each employee’s calendar. You can adjust the opening hours according to each employee. You do this by clicking on “Opening hours” -> “Calendar”. This will bring up a drop-down menu that makes it possible to jump between the employees’ calendars and specify opening hours. When you are done, click “Save Settings”. This also applies to you who have created several calendars for different places.
Add breaks
After you have decided on opening hours, you can also take the opportunity to add breaks. Add breaks for lunch, a walk or for afternoon coffee. You click on “Add break” and decide the time and length of the break. This way, you block times in your calendar, and customers will not be able to book an appointment during your break. When you take breaks, this will be the default and will appear in your calendar every week.
Block a specific time in your calendar
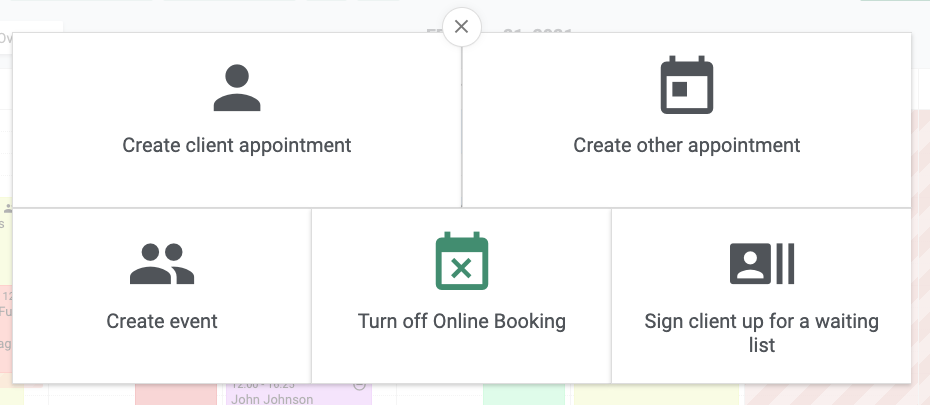
However, if you want to block a specific time in your calendar, this is also possible. This can be useful if you have an appointment with the dentist, hairdresser or other. To block a specific time, you must first click on the time you want to block. Then four options will come up. By clicking on “Turn off Online Booking” you can block a time in your calendar. Then select whether the event should be repeated again or not. You can choose between having the event repeated daily, weekly or fortnightly.
Remove blocked times
If you change your mind, it is possible to remove blocked times. By clicking on “Edit closing hours” it is possible to change the blocked time or delete. The blocked time appears as a calendar booking that can be clicked on. When you select the blocked time, “Edit booking” appears as an option. Click on and delete the blocked time.

Customise the settings for your calendar
Under “Settings” you can customise your calendar. This can be beneficial in many different ways. Here you decide, among other things:
- Time frame for your calendar (e.g. 9:00-17:00)
- Time intervals: Here you can choose that it should be, for example, 5 minutes or up to 1 hour between each free appointment.
- Time zone
You can also decide whether times should overlap or not, and whether specific services should appear on calendar bookings through colour coding. In other words, there are several options for designing your calendar specifically based on you and your employees’ needs.
In our Help Centre we have a whole section dealing with our Calendar Function.
If you have any questions or comments, please get in touch at [email protected] and we’ll get right back to you! ? If you wish to try out our booking system free of charge to see if it works for you!
 alt tab and computer
  alt Online scheduling
  alt Create special Vouchers for your services